How are the holes of a solderless breadboard connected internally?
Each short row of five holes (a terminal strip) is connected, the two halves are separated by the centre gap, and the long power rails along the edges are connected along their full length.
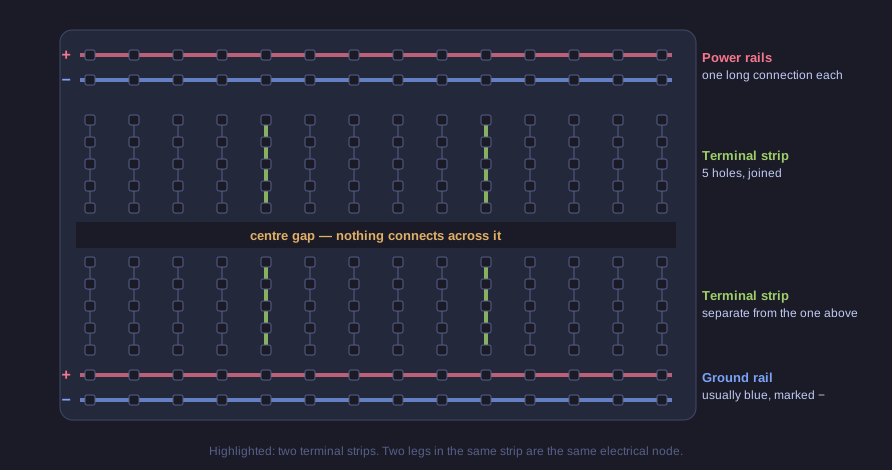
* Terminal strips connect across a short row of five; power rails connect along the whole edge; nothing crosses the centre gap. *
A breadboard lets you build and change a circuit with no soldering, which is why it is the standard way to make a first prototype. Under the plastic are metal spring clips:
- Terminal strips fill the middle. Each strip is a group of five holes connected to each other. Two component legs pushed into the same strip are wired together.
- The centre gap splits every strip in two. A chip in a dual-row package straddles the gap, so each of its pins lands on its own strip and no two pins are shorted.
- Power rails run along the long edges, usually marked red (+) and blue (−). Each rail is one long connection, so the supply voltage and ground are available anywhere along the board. On some full-size boards the rails are split in the middle; check with a multimeter.
The classic beginner mistake is placing a component with both legs in the same strip. An LED placed that way is shorted out: both legs are the same node, so no current flows through it.
Tip: strips across, rails along. Rotate the board and the rule rotates with it.
Go deeper:
 SparkFun — How to Use a Breadboard — photos of the metal clips inside, with the rail and strip layout.